
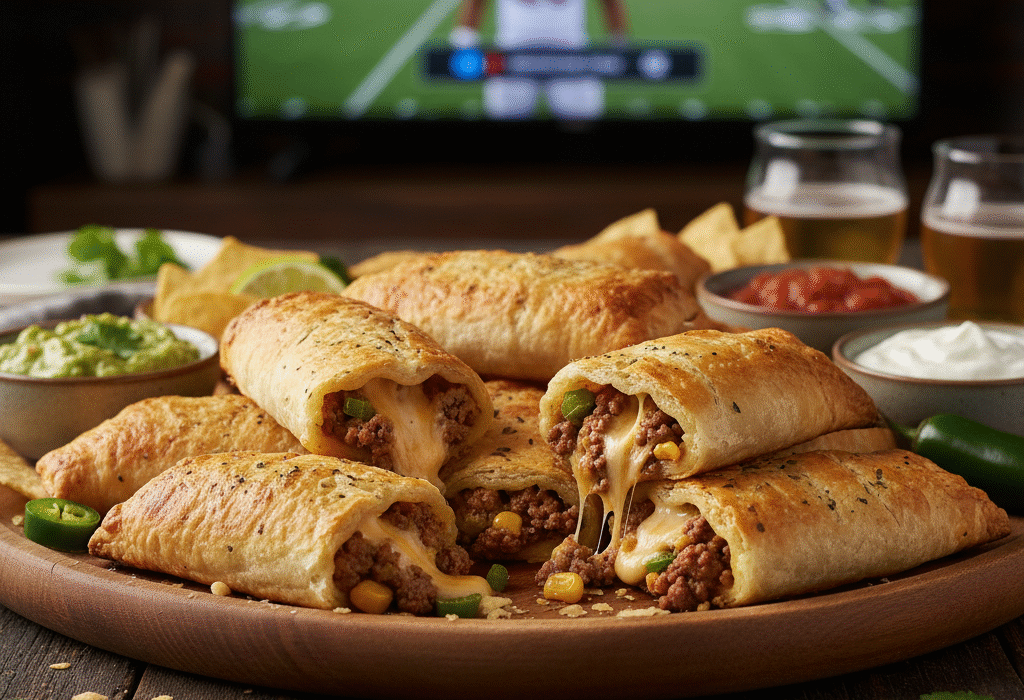
Are you ready to elevate your snack game to a whole new level? Forget the same old chips and salsa. It’s time to bring a new hero to the table, one that’s crispy, savory, and oozing with cheesy goodness. These Cheesy Taco Sticks are a guaranteed crowd-pleaser, perfect for game day, movie night, or any time you need a delicious, satisfying bite. They’re incredibly easy to make and impossible to resist. Let’s get cooking!
Cheesy Taco Sticks Recipe
Prep Time: 20 minutes Cook Time: 15 minutes Total Time: 35 minutes Servings: 4-6 people (approx. 16 sticks) Calories: ~350 kcal per serving
Ingredients
- 1 lb ground beef
- 1 packet taco seasoning mix (or 2-3 tbsp homemade taco seasoning)
- 1 cup shredded cheddar cheese
- 1/2 cup shredded Monterey Jack cheese (or a mix of your favorite cheeses)
- 2 tbsp water
- 1 can (13.8 oz) refrigerated pizza crust dough
- 1 egg, beaten
- 1 tbsp milk or water
- For serving: Sour cream, guacamole, salsa, chopped cilantro, or jalapeños
Instructions
- Prepare the Taco Meat: Preheat your oven to 400°F (200°C). In a large skillet over medium-high heat, brown the ground beef until fully cooked. Drain any excess fat. Add the taco seasoning and 2 tbsp of water. Stir well and cook for 1-2 minutes until the seasoning is fully incorporated and the mixture is fragrant. Remove from heat and set aside to cool slightly.
- Mix the Filling: In a medium bowl, combine the cooled taco meat with the shredded cheddar and Monterey Jack cheeses. Mix thoroughly until the cheese is evenly distributed throughout the meat.
- Prepare the Dough: Unroll the refrigerated pizza crust dough onto a clean, floured surface. Using a rolling pin, gently stretch the dough into a large rectangle, approximately 12×16 inches. You want it to be thin but still easy to work with.
- Assemble the Sticks: Spread the taco meat and cheese mixture evenly over one half of the dough, leaving a 1-inch border along the edges. Be generous but avoid overstuffing, as you need to be able to seal the sticks.
- Roll and Seal: Fold the other half of the dough over the filling. Using your fingers, press down firmly along the edges to seal the dough. You can also use a fork to crimp the edges for an extra-secure seal and a nice visual detail.
- Cut the Sticks: Using a pizza cutter or a sharp knife, cut the large rectangle into 16 equal strips, about 1 inch wide.
- Egg Wash and Bake: In a small bowl, whisk together the beaten egg with 1 tbsp of milk or water to create an egg wash. Brush the tops of the Cheesy Taco Sticks with the egg wash. This will give them a beautiful golden-brown color and a glossy finish.
- Bake to Golden Perfection: Place the sticks on a baking sheet lined with parchment paper. Bake for 15-18 minutes, or until the dough is golden brown and crispy and the cheese is melted and bubbly.
- Serve and Enjoy: Remove from the oven and let them cool for a few minutes before serving. Arrange them on a platter with your favorite dipping sauces and toppings.
Why These Cheesy Taco Sticks Are a Game-Changer
This recipe isn’t just about making a snack; it’s about creating an experience. The combination of a crispy, golden-brown crust and a savory, spicy, and incredibly cheesy filling is truly addictive. The best part? The customizable nature of the filling. Don’t like ground beef? Try ground chicken or turkey. Want to add some heat? Dice up some jalapeños and mix them in. The possibilities are endless, and each variation is as delicious as the last.
Tips and Tricks for Perfect Taco Sticks
- Don’t Overstuff: While it’s tempting to pack in as much filling as possible, overstuffing can lead to messy leaks during baking. Stick to the recommended amounts for the best results.
- Seal Tightly: Make sure to press the edges of the dough together firmly. A good seal prevents the cheesy filling from oozing out and burning on the baking sheet.
- The Right Dough: While pizza dough is the go-to for its sturdiness and flavor, you can also use puff pastry for a flakier, richer texture. If you choose puff pastry, just be mindful of the baking time, as it may cook a bit faster.
- Homemade Taco Seasoning: If you’re out of the packet kind, it’s easy to make your own. A simple mix includes chili powder, cumin, paprika, onion powder, garlic powder, and a pinch of cayenne pepper.
- Serving Suggestions: Think beyond the usual sour cream and salsa. A creamy avocado-lime dip, a spicy queso, or even a simple squeeze of fresh lime juice can elevate the flavors.
A Little History of the Taco
The taco, in its most basic form, has a rich history that dates back to the 18th century Mexican silver mines. The word “taco” originally referred to the paper used to wrap gunpowder and place it into boreholes. The miners’ meal, often a piece of meat with a tortilla, likely came to be known as “tacos de minero,” or “miners’ tacos,” because they resembled the dynamite-like shape. From these humble beginnings, the taco has evolved into a global culinary icon, with countless variations from street-side stands to high-end restaurants. Our Cheesy Taco Sticks are a playful, modern twist on this classic, honoring its savory roots while embracing a fun, snackable format.
The Power of Shared Food
There’s something special about gathering around a platter of delicious, shareable food. Food brings people together, sparking conversations and creating memories. These Cheesy Taco Sticks are designed for that very purpose. They’re easy to grab, perfect for passing around, and a surefire way to get people talking. The smell alone will fill your kitchen with a warmth and excitement that signals a good time is about to begin. So, whether you’re hosting a big party or just enjoying a cozy night in, whip up a batch of these and watch them disappear in minutes.
Your Turn!
Have you tried making these Cheesy Taco Sticks? What are your favorite dippable sauces? Share your variations and photos in the comments below! We’d love to see your creations.
Cheesy Taco Sticks: The Ultimate Game Day Snack
Malzemeler
Method
- Cook and season beef. Mix with cheese.
- Spread filling on half of the pizza dough.
- Fold, seal edges, and cut into sticks.
- Brush with egg wash and bake until golden.
- Serve with your favorite dips!