
Oh my goodness, you are in for a treat today! You asked for a spicy chicken recipe, and I’m going to deliver one of my absolute favorites: Spicy Honey Garlic Chicken. It hits all the right notes—sweet, sticky, savory, and with a beautiful, manageable kick of heat. It’s the kind of dish that makes your weeknight feel like a weekend. Seriously, once you master this, you’ll be making it again and again. It’s super simple, comes together quickly, and is one of those meals that impresses everyone, even though it’s barely any effort. Let’s just dive right into the good stuff, shall we? Because what are we waiting for?
Ingredients: Your Spicy Honey Garlic Arsenal
Before we get our hands sticky (in the best way possible), we need to gather our troops. I always suggest reading through the ingredient list and the instructions once or twice before starting. It makes the whole process smoother, like a well-choreographed dance, but with less leaping and more delicious simmering.
This recipe uses a fantastic blend of pantry staples and a few specific ingredients that really elevate the flavor. I’m focusing on chicken thighs because they stay incredibly juicy and have more flavor, but you can absolutely use chicken breasts if that’s your preference—just be mindful of overcooking them!
For the Chicken:
- 1.5 lbs (about 680g) Boneless, Skinless Chicken Thighs: Cut into bite-sized 1-inch (2.5 cm) chunks. Like I said, thighs are my go-to for flavor and moisture!
- 1/4 cup Cornstarch: This is our secret to a crispy exterior. Don’t skip it!
- 1 teaspoon Salt: Standard table or sea salt works fine.
- 1/2 teaspoon Black Pepper: Freshly ground is always best, but pre-ground is totally okay.
- 2 tablespoons Olive Oil or Neutral Oil: For searing the chicken and building the base flavor.
For the Spicy Honey Garlic Sauce (The Star!):
This is where the magic happens. We’re creating a perfect balance of sweet, savory, and spicy.
- 1/2 cup Honey: A good, thick honey is best. The stickier, the better.
- 1/4 cup Soy Sauce: Low-sodium is usually what I reach for, as it gives you more control over the final saltiness.
- 3-4 Cloves Garlic: Minced. And yes, you can always add more garlic. I consider four to be a polite suggestion; sometimes I go wild and use six!
- 1-2 Tablespoons Sriracha or Chili Garlic Sauce: This is the heat component. Start with one tablespoon for a moderate kick, and move to two (or more!) if you like to really feel the fire. Remember, you can always add heat, but you can’t easily take it away!
- 1 tablespoon Rice Vinegar: This brightens up the whole dish and cuts through the richness of the honey.
- 1/2 teaspoon Ground Ginger: Or, if you have fresh, a teaspoon of freshly grated ginger is even better. It adds such a wonderful warmth.
- 1/4 cup Water (or Chicken Broth): To thin the sauce slightly and help it simmer.
For Garnish and Serving:
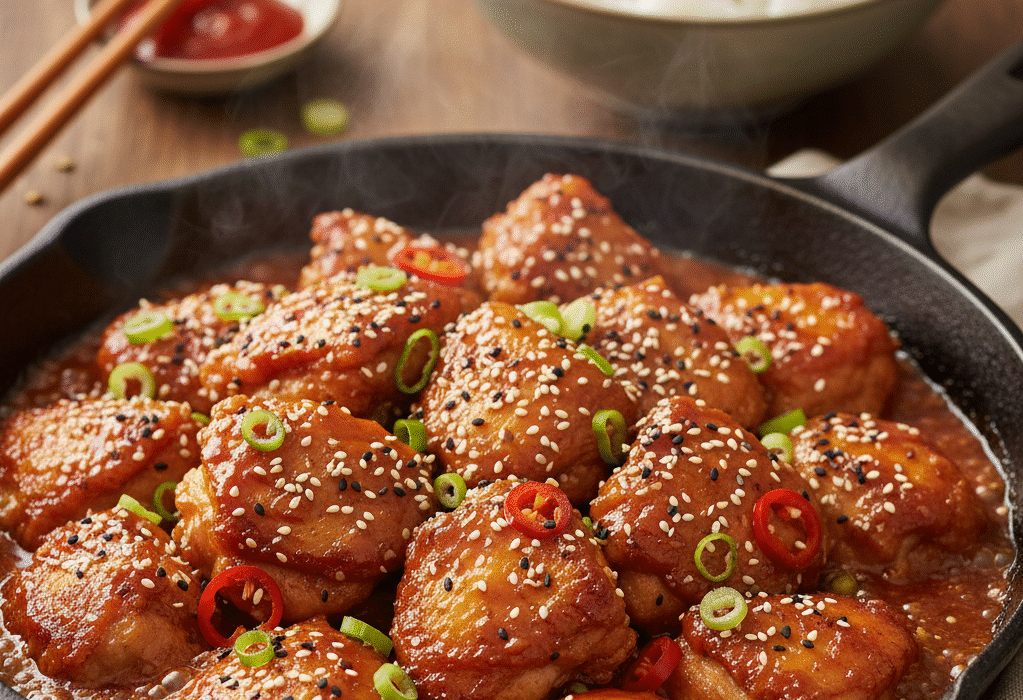
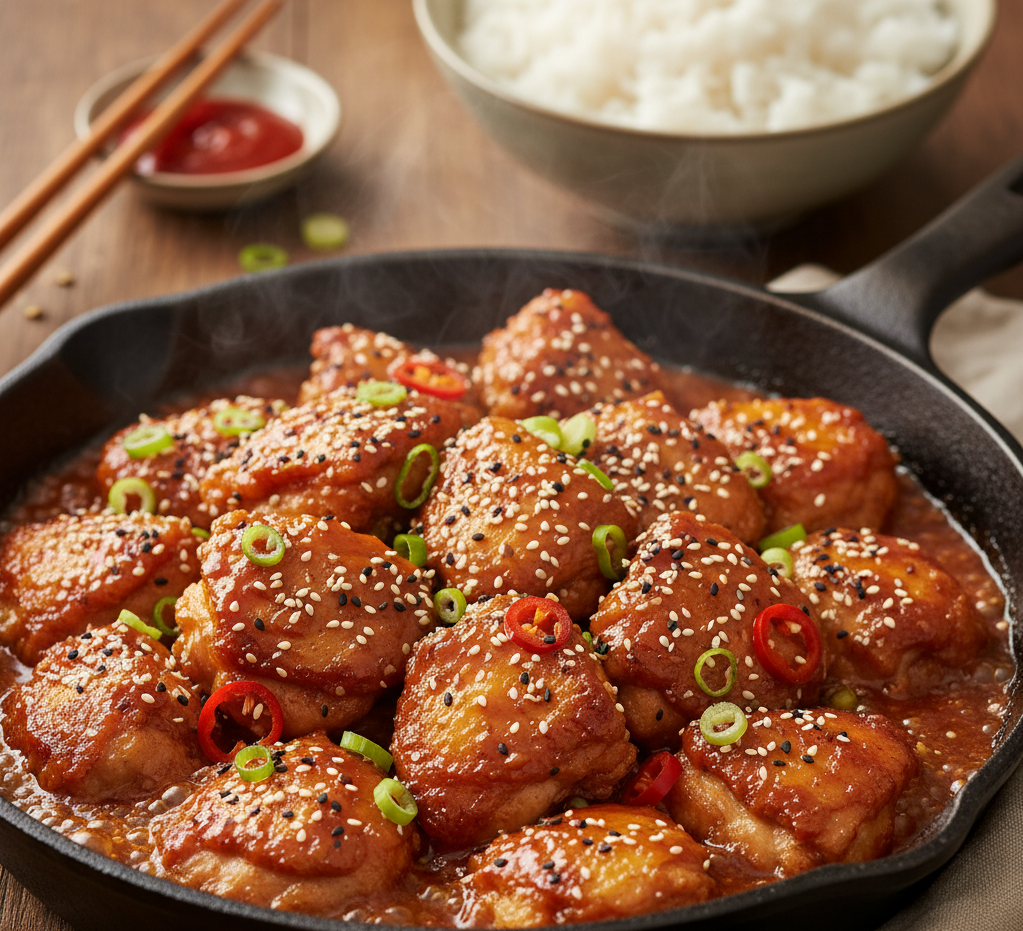
- 1 tablespoon Sesame Seeds: Toasted or plain, for texture and a beautiful look.
- 2 Green Onions (Scallions): Thinly sliced, for a fresh, oniony bite and a pop of color.
- Steamed Rice or Noodles: The perfect vehicle for soaking up all that incredible sauce.
That’s all there is to it! Simple, right? Now, let’s get cooking.
Instructions: From Prep to Plate
This recipe moves quickly once you start cooking, so it’s a good idea to have your chicken cut and your sauce ingredients measured out and ready to go. We call this “mise en place” in fancy cooking circles, but really, it just means “get your stuff together.”
Step 1: Prep the Chicken (The Crispy Coating)
First things first, let’s make that chicken absolutely perfect.
- Cut the Chicken: Take your boneless, skinless chicken thighs and chop them into uniform, bite-sized pieces, about an inch square. Uniform pieces mean they cook evenly!
- Season and Coat: In a medium bowl, toss the chicken pieces with the salt and pepper. Now, sprinkle the cornstarch over the chicken. Use your hands to toss and mix thoroughly until every single piece is lightly coated in a white, powdery layer. Pro-Tip: The cornstarch is key! It’s what gives the chicken a light, crispy crust that holds up beautifully to the sticky sauce.
Step 2: Sear the Chicken (Building the Base)
We want a nice, golden-brown crust on the chicken before we add the sauce.
- Heat the Oil: Heat the 2 tablespoons of oil in a large skillet or pan over medium-high heat. You want it to be shimmering hot but not smoking.
- Cook the Chicken: Carefully add the coated chicken pieces to the hot pan, making sure not to overcrowd it. If you have too many pieces, cook them in two batches. Overcrowding cools the pan down and you’ll end up steaming the chicken instead of searing it. We want SIZZLE, not simmer!
- Sear Until Golden: Let the chicken cook for about 4-5 minutes on the first side without moving it—this is how you develop that lovely crust. Flip the pieces and cook for another 3-4 minutes, or until all sides are nicely golden and the chicken is cooked through (internal temperature of or ).
- Remove and Reserve: Once cooked, take the chicken out of the pan and set it aside on a clean plate. Leave any residual oil or little crispy bits (fond!) in the pan—that’s pure flavor!
Step 3: Mix and Simmer the Sauce (The Flavor Bomb)
Now for the best part. The sauce is so easy it’s almost cheating.
- Make the Sauce: In a small bowl, whisk together the honey, soy sauce, minced garlic, Sriracha (or chili garlic sauce), rice vinegar, ground ginger, and water (or broth). Give it a good whisk until everything is mostly combined. Don’t worry if the honey is a little reluctant to mix in completely yet.
- Add to the Pan: Pour the sauce mixture into the same skillet you cooked the chicken in. Set the heat to medium.
- Simmer and Thicken: Bring the sauce to a gentle simmer. It will start to bubble slightly. As it heats up, you’ll notice it starts to thicken almost magically. You want it to cook for about 2-3 minutes, stirring occasionally, until it coats the back of a spoon. It should look glossy and beautifully viscous. If it gets too thick, just add a splash more water or broth.
Step 4: Combine and Garnish (The Grand Finale)
We’re almost there! This is the moment the dish comes together.
- Return the Chicken: Gently slide the seared chicken pieces back into the simmering sauce.
- Toss to Coat: Use a wooden spoon or spatula to toss the chicken, making sure every piece is completely covered in that glorious, sticky, spicy honey glaze. Let it cook together for about 1 minute, just to warm everything up and ensure maximum stickiness.
- Serve and Garnish: Turn off the heat. Plate the chicken over a bed of fluffy rice or noodles. Sprinkle generously with sesame seeds and the sliced green onions. Serve immediately and watch everyone’s eyes light up!
The Joy of the Simple Kick: Why This Recipe Works
Okay, now that the hard part (the 15 minutes of cooking) is over, let’s chat about why this recipe is such a champion.
I love this dish because it’s a perfect example of a high-reward, low-effort meal. In the food world, we often talk about “balanced flavor,” and this recipe is a masterclass in that. You’ve got the sweetness from the honey, the deep umami and saltiness from the soy sauce, the bright acidity from the rice vinegar, and, of course, the heat from the Sriracha or chili garlic sauce. Each element plays a crucial role.
Think about it: have you ever had a spicy dish that was just… all heat? It just assaults your taste buds, right? This chicken is different. The honey acts as a brilliant counterpoint to the spice. It doesn’t just make it sweet; it mellows the texture of the spice, turning the sharp, aggressive heat into a warm, lingering glow. You get the initial hit of the chili, but then the soothing sweetness washes over your palate, inviting you back for the next bite. It’s addictive!
Customizing the Heat Level
Speaking of heat, a blog post about a spicy chicken recipe wouldn’t be complete without a full guide to dialing the temperature up or down.
- Mild but Flavorful: If you’re a little hesitant about the spice, use a milder hot sauce (like a very mild cayenne pepper sauce) or just skip the Sriracha entirely and add a pinch of chili flakes for visual effect and a very subtle warmth. The ginger and garlic will still provide plenty of robust flavor.
- Medium and Mellow: This is where the recipe as written (1-2 tablespoons of Sriracha) lives. It’s noticeable, it makes your nose run slightly, but you can still have a full conversation and taste all the other flavors. It’s the “crowd-pleaser” level.
- Fire-Eater Status: Okay, you want to sweat a little? I get it. To crank it up, there are a few things you can do:
- Add More Sriracha: An obvious choice. Push it up to 3 or even 4 tablespoons.
- Introduce Gochujang: Swap out a tablespoon of the Sriracha for Gochujang (Korean chili paste). It’s a fermented paste that adds a deep, complex, smoky heat that is absolutely divine.
- Fresh Chili Power: Mince a few fresh Thai bird’s eye chilies or a jalapeño and throw them into the pan with the garlic in Step 3. The raw, fresh heat is completely different and wonderfully aggressive. Handle with care!
Serving Suggestions: Making it a Meal
While this chicken is the undoubted star, a good supporting cast makes the whole show better.
- Classic Comfort: The simplest and most satisfying way is over plain, steamed Jasmine or Basmati rice. The rice soaks up that glorious sticky sauce like a sponge. Perfection.
- Noodle Heaven: Toss the chicken and sauce with some fresh stir-fry noodles or even a bed of ramen. A quick toss, and you have an instant noodle bowl better than any takeout.
- Veggie Power: To make it a well-rounded meal, serve it alongside some simple steamed broccoli, asparagus, or a quick stir-fry of bell peppers and onions. The fresh, crisp texture of the veggies is a beautiful contrast to the tender, sticky chicken. You can even toss the veggies with the remaining sauce at the end!
- A Fresh Crunch: For a light dinner, serve the chicken in large lettuce cups (like butter or romaine lettuce) with a side of chopped peanuts for an extra crunch. It feels fresh and light but still packs a powerful flavor punch.
A Few Parting Thoughts for the Home Cook
As a final, conversational touch, let me share a few home cook secrets I’ve learned from making this dish countless times:
- The Pan Matters: Use a non-stick or well-seasoned cast iron skillet. Sticky sauces and stainless steel pans can be a nightmare to clean if you let things burn. A good non-stick surface makes the caramelization perfect and cleanup a breeze.
- Don’t Rush the Sear: Seriously, that 4-5 minutes of not touching the chicken in the pan (Step 2) is the key to the crispy texture. If you keep poking and prodding it, it won’t be allowed to develop that delicious brown crust. Patience is a virtue, especially when cooking chicken.
- Meal Prep King: This is a fantastic recipe for meal prepping. Make a large batch and store it in airtight containers with your rice or veggies. It reheats beautifully and the sauce stays just as sticky and flavorful. Lunch is solved!
So there you have it. You’ve got the recipe, the tips, and the enthusiasm. You’re ready to transform some humble chicken thighs into a dish that will have everyone asking for the recipe. Go forth and embrace the heat! Happy cooking!
The 30-Minute Sizzle: Sticky, Spicy Honey Garlic Chicken That Beats Takeout
Malzemeler
Method
- Prep Chicken: Dice the chicken, season with salt and pepper, then toss well to coat completely with cornstarch. This makes it crispy!
- Make Sauce: Whisk all sauce ingredients together in a small bowl. Easy peasy.
- Sear: Heat oil in a large skillet over medium-high heat. Add the chicken and cook until all pieces are golden brown and fully cooked. Do this in batches if needed.
- Simmer: Pour the sauce into the same pan and bring it to a low simmer. Let it cook for 2-3 minutes until it thickens into a beautiful, sticky glaze.
- Toss & Serve: Return the seared chicken to the pan. Toss everything gently until every piece is perfectly coated in the shiny sauce.
- Finish: Garnish with sesame seeds and green onions. Serve hot over rice or noodles and enjoy!